Which Terminal Do You Connect First on a Car Battery
Always connect the positive (red) terminal first when attaching a car battery, then the negative (black) terminal last. Disconnecting follows the reverse order — negative first, then positive. This sequence protects your vehicle’s electrical system and keeps you safe from sparks and short circuits.
Every car owner faces this moment at least once. You are standing in the garage or a parking lot, staring at a dead battery. The cables are in your hand, and the question hits you — which terminal do you connect first on a car battery? It sounds simple, but getting the order wrong can damage your vehicle or even cause injury.
The good news is that the answer is straightforward. Connecting the positive terminal first is the golden rule of battery installation. Once you know this rule and understand why it matters, you will never second-guess yourself again. Let us walk through everything you need to know, step by step.
Whether you are replacing an old battery, giving someone a jump start, or just trying to learn more about your car, this guide covers it all. We will explain the correct battery connection order, the dangers of doing it wrong, and practical tips that make the whole process safer and easier.
Key Takeaways
- Positive first, negative last: Always attach the red (positive) clamp before the black (negative) clamp when connecting a battery.
- Disconnect in reverse: When removing cables, take off the negative terminal first to prevent short circuits.
- Safety matters: Wearing gloves and goggles reduces the risk of acid burns and electrical shock.
- Corrosion affects performance: Clean battery terminals before connecting to ensure a strong, reliable connection.
- Wrong order causes damage: Connecting negative first can fry sensitive electronics in modern vehicles.
- Practice makes perfect: Familiarizing yourself with the process helps during emergencies like a dead battery or a jump start situation.
📑 Table of Contents
- Why Terminal Connection Order Matters
- What You Need Before Starting
- Step-by-Step Guide to Connecting a Car Battery
- Disconnecting the Battery: Reverse the Order
- Common Mistakes to Avoid
- Jump Starting a Car Safely
- Quick Tips for Battery Safety
- Expert Insights on Battery Terminal Connections
- When to Call a Professional
- Conclusion
Why Terminal Connection Order Matters
Your car battery has two terminals. One is marked positive (+), and the other is marked negative (-). The positive terminal usually has a red cover or a plus sign. The negative terminal has a black cover or a minus sign. Battery polarity is not just a label — it determines how electricity flows through your vehicle.
When you connect the terminals in the wrong order, you create a risk of short circuits. A short circuit can fry your car’s computer modules, fuse boxes, and sensitive electronics. Modern vehicles are packed with tiny computers. One wrong spark near these systems can lead to expensive repairs.
Connecting the positive terminal first ensures that the electrical circuit completes safely. The negative terminal connects to the car’s chassis, which acts as a ground. By saving the ground connection for last, you reduce the chance of sparks near the battery. Batteries can emit flammable gases, so minimizing sparks is critical.
The Science Behind the Order
Here is a simple way to think about it. Your car’s electrical system works like a loop. Power flows from the battery through the wires and back to the battery. When you connect the positive side first, you are only touching one end of the circuit. Nothing happens yet because the loop is not complete. Then, when you connect the negative side, the loop closes and power flows normally.
But if you connect the negative terminal first, the clamp is now touching the grounded metal of your car. If the positive clamp accidentally touches any metal part of the engine block or chassis, you get a spark. That spark can ignite battery gases. It can also send a power surge through wires that are not meant to handle it yet.
What You Need Before Starting
Before you touch any cables, gather a few things. Being prepared makes the job faster and safer.
- A new battery or a fully charged battery for replacement.
- Battery terminal cleaner or a wire brush to remove corrosion.
- Safety gloves and protective goggles.
- Wrench or pliers to loosen the terminal clamps.
- Anti-corrosion spray or petroleum jelly for protection.
Also, make sure the car ignition is off. Remove the keys from the ignition. If you are working in a garage, open the door for ventilation. Batteries release hydrogen gas, which is highly flammable. A small spark from a tool can be dangerous.
Step-by-Step Guide to Connecting a Car Battery
Now that you are prepared, let us walk through the actual process. Follow these steps carefully, and you will have a secure, safe connection every time.
Step 1: Identify the Terminals
Look at your battery. Find the positive terminal, marked with a plus sign or colored red. Find the negative terminal, marked with a minus sign or colored black. If the markings are faded or covered in grime, use a cloth to clean the top of the battery. You need to see the symbols clearly before proceeding.
Step 2: Clean the Terminals
Corrosion on battery terminals looks like a white or greenish powdery buildup. This buildup blocks the electrical connection and can cause your car won’t start even with a new battery. Use a wire brush or a terminal cleaner to scrub both posts until they shine. Wipe away any residue with a dry cloth.
If you notice heavy corrosion, you might need to replace the battery cables. Damaged cables can cause poor electrical flow and intermittent starting problems.
Step 3: Place the Battery in the Tray
Lift the battery carefully and set it into the battery tray. Make sure it sits flat and secure. The terminals should face the correct direction, usually toward the front of the engine bay. Some batteries have a designated side for positive and negative posts, so double-check your vehicle’s manual if you are unsure.
Step 4: Connect the Positive Terminal First
This is the most important step. Take the red clamp and attach it to the positive battery post. Tighten the nut firmly but do not overtighten. You want a snug connection that does not wobble. Always connect the positive terminal first.
At this point, the negative clamp should stay away from any metal surfaces. Hold it in your hand or rest it on the cable so it cannot accidentally touch grounded metal.
Step 5: Connect the Negative Terminal Second
Now take the black clamp and attach it to the negative battery post. If the negative post is not accessible, you can attach the clamp to a clean, unpainted metal bolt on the engine block. This is called grounding the battery through an alternate point.
Tighten the nut securely. Give both clamps a gentle tug to make sure they are firm. A loose connection can cause starting issues and even damage the electrical system over time.
Step 6: Apply Anti-Corrosion Protection
Once both terminals are connected, apply a thin layer of anti-corrosion spray or petroleum jelly to each post. This simple step prevents future buildup and extends the life of your battery connections.
Disconnecting the Battery: Reverse the Order
When it is time to remove the battery, you do the opposite. Start with the negative terminal first. This breaks the ground connection and prevents any accidental short circuits. Then remove the positive terminal. Always follow this reverse order for disconnection.
Think of it this way. When connecting, you build the circuit one safe step at a time. When disconnecting, you break the circuit the same careful way. The negative terminal is connected to the car’s frame, so removing it first ensures there is no path for electricity to flow through the vehicle’s body.
Common Mistakes to Avoid
Even with the best intentions, people make mistakes when working with car batteries. Here are the most common errors and how to avoid them.
- Connecting negative first: This is the number one mistake. It increases the risk of sparks and electrical damage.
- Skipping terminal cleaning: Dirty terminals cause poor connections, voltage drops, and starting failures.
- Overtightening clamps: This can crack the battery post or strip the threading. Tighten just enough to be secure.
- Working near open flames: Battery gases are explosive. No smoking, no sparks, and no open flames nearby.
- Ignoring battery age: If your battery is more than three to five years old, consider replacing it even if it still holds a charge.
If you are ever unsure about your battery’s condition, a simple battery load test at an auto parts store can tell you if it is time for a replacement. Many stores offer this test for free.
Jump Starting a Car Safely
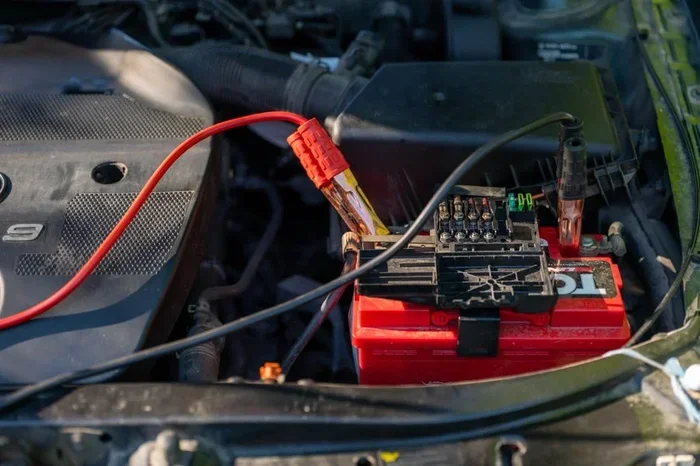
Sometimes your battery dies because of a left-on light or an old battery that just gave out. In that case, you need to jump start a car using another vehicle or a portable jump starter. The connection order for jumper cables follows the same rule — positive first, negative last.
Here is the safe sequence for jump starting:
- Connect the red clamp to the dead battery’s positive terminal.
- Connect the other red clamp to the good battery’s positive terminal.
- Connect the black clamp to the good battery’s negative terminal.
- Connect the last black clamp to an unpainted metal surface on the dead car’s engine block (not the battery post).
- Start the working vehicle first, then try starting the dead vehicle.
When disconnecting jumper cables, reverse the order. Remove the black clamp from the dead car first, then work your way back. This prevents sparks near the battery where gases may be present.
For more tips on handling starting problems when your key is not working, check out how to start a car without key using safe and expert methods. This can be a lifesaver when battery issues are compounded by a lost or faulty key.
Also, if you are dealing with a vehicle that refuses to turn over, understanding battery maintenance and proper terminal care goes a long way. Keeping your terminals clean and connections tight prevents many common starting problems before they happen.
Quick Tips for Battery Safety
- Always wear safety gloves and goggles when handling batteries.
- Keep metal tools away from both terminals at the same time.
- Store batteries in a cool, dry place to extend their lifespan.
- Check terminal connections every few months for looseness or corrosion.
- Never attempt to jump start a battery that is visibly cracked or leaking.
These small habits protect you and your vehicle. Battery safety is not complicated, but it does require attention to detail. A few minutes of care can save you hours of troubleshooting and hundreds of dollars in repairs.
Expert Insights on Battery Terminal Connections
Automotive technicians agree on one thing — the connection order is not just a suggestion. It is a safety protocol. ASE-certified mechanics follow the positive-first rule every single time. They know that modern vehicles have sensitive ECU modules and computer systems that can be damaged by a single electrical surge.
Many experienced mechanics also recommend checking the battery voltage before and after installation. A healthy battery should read around 12.6 volts when the engine is off. If the voltage is significantly lower, the battery may need charging or replacing. Using a simple multimeter takes the guesswork out of battery health.
Another expert tip is to apply dielectric grease to the terminals after connection. This substance repels moisture and prevents corrosion without interfering with the electrical connection. It is a small addition that pays big dividends over time.
If you are replacing a battery and notice that your car battery replacement process feels complicated, do not hesitate to consult your vehicle’s manual or ask a professional. Some vehicles have battery locations that are not immediately obvious, and some require resetting electronic systems after a battery change.
When to Call a Professional
Most battery connections are straightforward. But there are times when calling a professional makes sense. If your battery terminals are severely corroded and won’t clean up, a mechanic can assess whether the cables or the battery itself needs replacement. If your car still won’t start after a proper battery install, the problem might be with the alternator or the starter motor.
Also, if you are uncomfortable working with car batteries for any reason, that is completely okay. A trained technician can handle the job quickly and safely. There is no shame in asking for help. Your safety always comes first.
Remember that car battery safety is about more than just the order of connections. It is about respecting the electrical power in your vehicle and taking every precaution to protect yourself and your car.
Conclusion
So, to answer the question directly — which terminal do you connect first on a car battery? The answer is always the positive (red) terminal. Connect positive first, negative second. Disconnect in the opposite order. This simple rule protects your vehicle’s electronics, prevents dangerous sparks, and keeps you safe while working under the hood.
Whether you are installing a new battery, cleaning corroded terminals, or giving yourself a jump start, the connection order never changes. Make it a habit, and you will never have to worry about doing it wrong again. Share this knowledge with friends and family. A little awareness goes a long way in keeping everyone safe on the road.
Now that you know the correct battery connection order, you can handle this common car maintenance task with confidence. Grab your gloves, follow the steps, and enjoy the satisfaction of a job done right.
Frequently Asked Questions
Can connecting the negative terminal first damage my car?
Yes, it can. Connecting the negative terminal first creates a path for electricity through the car’s metal frame. If the positive clamp accidentally touches grounded metal, it causes a spark that can damage sensitive electronics or ignite battery gases. Always connect the positive terminal first to avoid this risk.
What happens if I connect the battery cables to the wrong terminals?
Connecting the cables to the wrong terminals reverses the polarity. This can fry your car’s alternator, fuse box, and computer modules. It can also destroy the battery itself. Always double-check that the red cable goes to the positive terminal and the black cable goes to the negative terminal before tightening anything.
How do I know if my battery terminals need cleaning?
Look for a white, blue, or greenish powdery substance on the terminals. This is corrosion and it blocks the electrical connection. Other signs include difficulty starting the car, dim headlights, or a clicking sound when you turn the key. Cleaning the terminals with a wire brush usually fixes these issues.
Is it safe to touch both battery terminals at the same time?
No, it is not safe. Touching both terminals at once completes the circuit through your body. This can cause an electric shock, burns, or even injury. Always handle one terminal at a time and keep metal tools away from both posts simultaneously.
Do I need to reset anything after replacing my car battery?
Some vehicles require resetting the clock, radio presets, and power window settings after a battery change. Modern cars may also need a battery registration process done by a dealer or qualified mechanic. Check your vehicle’s manual for specific post-installation steps.
How long should a car battery last before needing replacement?
Most car batteries last between three and five years. Extreme weather, short trips, and leaving electronics on can shorten that lifespan. Have your battery tested annually after the three-year mark to stay ahead of any failures and avoid getting stranded with a dead battery.